How to Drill a Cabinet Access Hole


How to Drill a Cabinet Access Hole via Cottage Magpie

How to Drill a Cabinet Access Hole via Cottage Magpie

I love thrifted furniture. Often well-built, with more durability and character than anything you could buy new, thrifted furniture is funky and fun. Even more bonus? It’s often cheaper! But, old furniture doesn’t come with all the convenient punch-outs and access panels that new furniture does. So if you’re using an old piece of furniture but want to run power inside, for electronics or a charging station, you’re going to have to put a hole in it. The good news is that since you didn’t pay much for it, if you ruin it, it’s not too big of a deal, right?

So, it’s obvious that you need to cut a hole, but how? Of course there’s many options, but if you want a really nice, clean, round hole, one of the ways I like is to use a spade bit. Now, for those of you who are tool-savvy, this probably seems painfully obvious, but when I started doing my own DIY projects, I had no clue that such things existed, and I thought that there might be other people out there like me. Read on to see just exactly how this weirdly wide bit works so you can try it at home!

First off, you will need a special kind of drill bit for your drill called a “spade bit.” This special bit does a great job of cutting a clean hole just the way you want it. They look like this:

Spade Bit Set via Cottage Magpie

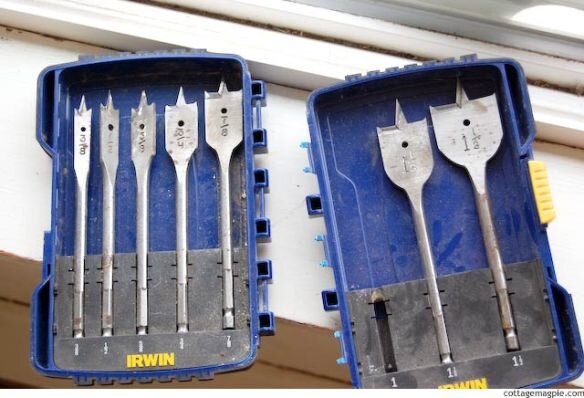
We got a set for Christmas a few years ago from family, and I’ve really appreciated having it. But you can just buy the one bit you need, too, rather than invest in a whole set.

Updated: I just checked over at Lowes.com, and in my area this same set sells for $20.97. A smaller, 4-bit set sells for just over $9.38, and a single bit sells for just over $3.58. So they’re not super expensive. To check, just search for “spade bit” at whatever hardware store you usually use.

Either way, you’ll need your power cord to know what size you need. Just hold the smallest end up to the bits and see which one is big enough. You can do that with your set at home, like I am doing here, or in the store before you buy your bit.

This one is too small:

Finding the Right Spade Bit via Cottage Magpie

The next size up looks just right:

Finding the Right Spade Bit via Cottage Magpie

It turns out to be a 1 1/2 inch spade bit as you can see by the markings stamped on it:

Spade Bits via Cottage Magpie

I suspect that may work for most situations, so try that one first if you go looking.

The spade bit fits into the drill just like any other bit. Just twist the collar at the end of the drill to release anything that’s in there, insert the small end of the bit and twist again to tighten. It will look something like this:

Drilling With a Spade Bit via Cottage Magpie

Drilling With a Spade Bit via Cottage Magpie

Next, point the business end of the bit at the spot you want to put your hole. I like to work from the back because it’s easier to aim and so forth, but make sure you are cutting into the right spot from the front and not hitting any shelves or supports or anything. You can measure from the sides or bottom or whatever you need to. Wherever you decide to drill, rest the little pointy end in the center of where you want the hole, like so:

Drilling With a Spade Bit via Cottage Magpie

Pull the trigger, and the bit will spin and the pointy part will make a nice pilot hole to hole the bit steady. It’ll sink and then the little pointy tips on the wide part of the bit will start cutting a circle, like this:

Drilling With a Spade Bit via Cottage Magpie

Keep going, and the flat part of the bit will start to shave away the wood:

Drilling With a Spade Bit via Cottage Magpie

Maintain a steady pressure. You have to push a little or it won’t cut anything away, but if you push too hard it’ll stick and stop turning. So just vary the pressure until you get a feel for how hard to push to get it to cut without sticking. Keep shaving away that wood!

Drilling With a Spade Bit via Cottage Magpie

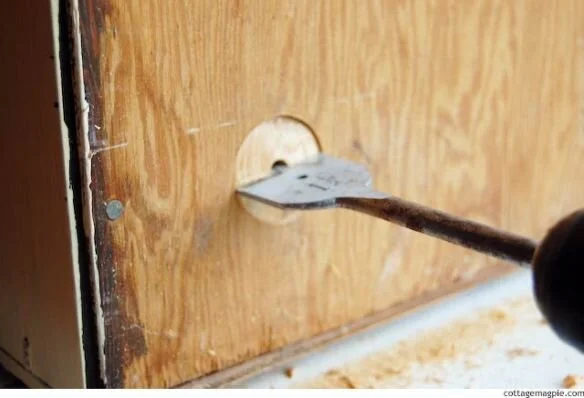
It’ll take a minute or two, but eventually you’ll break through. Again, try not to push too hard, you don’t want to tear the wood on the other side. Let the bit do it’s work and cut through:

Drilling With a Spade Bit via Cottage Magpie

And you’ll have a nice hole!

A Hole in the Back of a Cabinet via Cottage Magpie

Get a friend (or conveniently located child) to push the power cord through the hole for you to grab:

Feeding a Power Cord Through the Back of a Cabinet via Cottage Magpie

Pull the cord the rest of the way through, and voila! A power-cord accessible cabinet!

Charging Station Inside a Vintage Cabinet via Cottage Magpie

In my case, this will be a new, hidden charging station for my workshop!

What about you? Do you have a cabinet that needs a hole in it? 🙂

Love, Angela


Comments

34 responses to “How to Drill a Cabinet Access Hole”

  1. Barbara H. Avatar
    Barbara H.

    Angela, you do such a nice job showing how to do things step-by-step. Several years ago I printed out your post on whipping cream – it was wonderful. It took the fear out of turning it into butter! And I was just thinking I need to look again at your post on adding or changing a clock mechanism since a clearance score clock at Hobby Lobby isn’t working. Now you’ve done it again with this post. You are a great teacher.

    1. Gosh, Barbara that is so nice! I’m touched! I’m so glad to know that sometimes I’m helpful. It certainly makes it all worth it. Thank you! ~Angela~

  2. Well! Such a co-inky-dink! I did this very thing at Christmas time! With my mother’s glass cabinet. My daughter was not pleased, but I was and I knew my mom would be if she were still alive. HOWEVER….I did not have a fancy-pancy drill bit like yours. (ahem) I had a skill saw. Let me just say, if they make circles, I need more practice! But, it worked and I now have lighting in the cabinet to show off mom’s crystal. But you can bet that bit is going on my want list!!! Thanks!

    1. Hahahaha! Yep, Dona, I think circular saw is a misleading name! 🙂 The blade is circular, but the cuts they make are definitely NOT! The good news is that a spade bit is not expensive, so not a big investment to get one. I should add that information to the post! I’ll do that right now. ~Angela~

  3. Great advice! I love those bits. I’ve used one before, but did not pay attention to how my sizes are actually available, probably because I sent my spouse. :)If it is expensive furniture with doors and a finished inside back, but it is going up against a wall, one could unscrew the back and replace it with some melamine or a bead-board panel cut to size. Under my bed are stored leaves and backs of furniture.

    1. SJ, good tip!! For people who have really nice furniture, the non-destructive way is definitely better!! I don’t have any really nice furniture, so I’m a little cavalier about putting holes in things. Ha! 🙂 ~Angela~

  4. Is this whole blog a joke? It is not funny enough to be funny, but it is hard to believe the author, or anyone, could take this ‘work’ seriously. This post, including 15 photos, is about making a hole. Does the author think she invented the idea of a hole? I’m pretty sure that’s already a thing. Let’s see…I have something–let’s say a plug–that I would like to put through something solid–let’s say a piece of wood. What to do? There must be a way. How can I get this to the other side without going around? If only there was some way to go THROUGH the wood. If only. Sigh. (long thinking pause) I know! I will invent a way, and I will call it a HOLE! (maniacal laughter) Yes! YES! A HOOOOOOOLE!!!

    1. Hi Gigi,Sorry you didn’t like the post about drilling a hole through a cabinet back. Really my goal was to show people how to use a spade bit to drill a large hole, since many people don’t know how to do that. I probably could have made it more clear that that was my point — like having a title of “How to Use a Spade Bit to Drill a Hole Into the Back of a Cabinet,” but every title I came up with was sooooo long I went for a shorter one. I’m sorry if it wasn’t what you expected!~Angela~

      1. Well, Angela I guess Gigi should get her money back. Oh, you mean she didn’t pay you for your helpful directions. Oh, you mean you did not force her to read your blog or view your photos. Well now now Gigi you might just be in the wrong place.Thanks for the helpful tutorial Angela. Good to know which drill tip to use. Saved me a bunch of time & headaches for my next project.

        1. Hehehehe. Thank you, Jeni! I do try to share things that are useful. When *I* first started doing my own projects, I had NO IDEA how to drill a hole like that. I had to ask my Dad. So I figured there might be other people out there who might not know, either! It’s nice to hear that it was helpful. Thank you for stopping by! ~Angela~

          1. I actually Googled how to make a hole in my drawers and got linked to this blog. Ignore the arrogant so and so as this was really helpful!

          2. Hi Liam, I’m so glad it helped you! ~Angela~

    2. Angela, I really wish you hadn’t apologized to Gigi simply because SHE clearly needed a hug that day. Maybe she feels bad about herself because she know she chooses to be a mean-spirited critic.And for those of us who actually empower others to empower themselves, we know critics such as Gigi add absolutely no qualitative value to the conversation. If I didn’t add any qualitative value to those who surrounded me, I’m sure I would speak and think the same poison Gigi spews too.Anyway, thanks for that awesome tutorial with ALL of your pictures and your detailed instructions. Even if you know what you’re trying to achieve, it doesn’t mean that you know HOW to go about it, or in this case, the correct terminology for the necessary tools to complete the work.Thanks to your tutorial, I know what I should be looking for and exactly what to ask for.Keep up the good work and continue to help others help themselves!

      1. Thank you, you are very sweet to say that. I’m glad that the tutorial was helpful for you, I hope it helps others, too! ~Angela~

  5. This is GREAT. I need a hole in my bedroom drawer. I had never heard of the drill bits you describe. Unlike Gigi, I think you are a GENIUS, and I am grateful to you for the helpful tutorial. I just gotta find someone with a drill…and the right bit…..

    1. Thank you so much, Susan!! It’s always nice to hear that, especially when not everyone is so thrilled. Good luck finding the drill and bit! 🙂 ~Angela~

  6. Hi Angela,Further to my previous email, when I said I thought you were a GENIUS, I finally attempted to make a couple of holes today. I want to put holes in the top drawers of our bedside chests. I saw someone else had done this, on Pinterest I think, so instead of the powerboard and mess of charging cables etc all being on the floor next to the bed, like I have, all this stuff is tucked away neatly in the top drawer.I discovered we do in fact own a powerdrill (whether this is a relic from my late father or from one of my son’s friends, not sure but we have it) so I set off to our friendly hardware store with drill, drawers and pocketbook to buy a spadebit. But I didn’t reread your tutorial first (because I am an idiot) and in my limited understanding of working with 3-dimensional materials, I thought I only needed a hole big enough to fit a powercord through. Like I forgot about the, uh, PLUG.So I bought the spadebit big enough to fit a power cord through and came home and read your tutorial, and had an “Ah HA” moment. Went back with the powercord to the hardware. The hardware man didn’t have a spadebit big enough for the plug, and said I needed another thing, a round “hole saw” which he sold me after giving me instructions on how to attach it to my drill and use it. I also told Hardware Guy that I was an idiot and that my father had never shown me how to use any of his vast array of tools, you know, it’s a real sob story. Hardware Guy FINALLY said what I’d been hoping he’d say all along, and that was that he would help me, but only on the provisio that I had a go myself.I came home feeling fired up, my husband (who is more challenged even than I with this stuff) was waiting sort of anxiously and ready to panic, which he did while I was having a go with my hole saw on a practice piece of wood. As I was counting on my husband to HOLD the drawer while I made a hole in it, I felt maybe it was better if I went back to hardware guy, told him I was willing to do it myself, but could I please use his vice to hold the drawer. Anyway, Hardware Guy said as soon as he saw me, “You didn’t even TRY, did you?” Anyway, to make this long story a bit shorter, Hardware Guy had a go with the hole saw he sold me in his own drill, and discovered that the holesaw he sold me was in his words, “Crap”. He went looking for his own holesaw, couldn’t find it and then said, “I don’t know what to do.” Anyway, he said come back tomorrow and he’ll refund me the money for the crap he sold me, and somehow between now and then, get the holes put in my drawers. I guess it will happen, and my life will change, but not quite as easy as you made it look. To the girl who thinks it’s all so easy to put holes in furniture, I’d like to introduce her to my Hardware Guy (he thought it was pretty easy too, until he couldn’t do it himself). Regards, Susan

    1. Angela Avatar
      Angela

      Oh, Susan! What a story! I wish I lived nearby then I could just help do it for you. Hee hee!! Yes, a hole saw is a good option for larger holes. I use that for anything bigger than about two inches. Fortunately my plug fit my spade bit, but if it hadn’t, I would have gone for a hole saw also. Good luck! Please let me know how it turns out!! 🙂 ~Angela~

  7. Nice information. There are some other options. For example, if you look closely at your last picture, one can see some tearing of the wood around the hole where you punched through. When drilling, it is important to start drilling from the side that will be visible. Drill from that side. The other side will get some tearing when breaking through.Another option is to drill part way from one side, then drill the remaining part from the other side. Generally, it is a better idea to finish up from the side that will be visible.For work where it is important to be clean, take a piece of wood (1″ thick is ideal) and make a hole with your drill bit. This will act as a guide. Then clamp the guide in place over where the hole is to be made. Score around the edges with a utility knife inside the guide. The knife will make a clean edge and reduce the tearing of the wood. Then drill. I find this works for closet doors when inserting the finger pull.Finally, for completely clean work, purchase a Forstner bit. That will make a much cleaner hole than the type of drill bit that you used. Forstner bits are more expensive, less common, but can be purchased on line.

    1. Thanks for all the great tips, Larry! I am familiar with the Forstner bit, but I have never used it for a hole that goes all the way through, only for round indentations if that makes sense. I’ll have to try that next time. ~Angela~

  8. […] I drew on the wonderful tutorial from Angela at Cottage Magpie. (Check out her blog, she’s seriously awesome!) Drilling the holes in the back was pretty […]

  9. Thanks so much for this post. I have a project that I’d considered having someone else do just because I didn’t know how to get the holes in the wood. This post is exactly what I needed!

    1. Oh, thank you Tenagne! I’m so glad that it was helpful!! ~Angela~

  10. Hi Angela, I have a question. How can I finish some terrible cuts in the back of my cabinets. They were done for wires and pipes. i can’t stand the imperfection of these cuts. Thanks

    1. Hi Maria! It’s hard to say without taking a look at it. Do you want to send me a picture? ~Angela~

  11. J Jackson Avatar
    J Jackson

    Thank you. Exactly what I needed to know and the photos give me confidence.

    1. I’m so glad it helped! Thank you for visiting! ~Angela~

  12. Thank you, I was really struggling with this and had no idea it can be done with a drill!

    1. Angela Avatar
      Angela

      Thank you, Lucy! I’m glad it was helpful! 🙂 ~Angela~

  13. Michele Avatar
    Michele

    I bought a house that needs everything. The guy who first worked as my contractor made an asymmetrical hole in the new wood floor for the clothes-dryer hose, and the hole is jagged and awful-looking. I don’t know how it could be nicely trimmed but didn’t want anything like that to happen again, since i have more holes to drill–so your piece here educated me on my options. I need a hole drilled into the bottom of a kitchen cabinet for my range hood. Even if I don’t to the work myself, I’ll know what my next contractor should be using so he doesn’t create a mess like the first contractor did. What’s funny is that I’m super-educated but know NOTHING about doing practical stuff, so this email was definitely, a great start on Drilling for Dummies, which I wish someone would author.

    1. LOL! Michele, thank you! I’m glad it was helpful! ~Angela~

  14. Thanks for this. Just the information I need as I’m new to DIY. Really appreciate the clear instructions.

    1. Thank you, Lou! Glad it was helpful!

Leave a Reply

Your email address will not be published. Required fields are marked *