How to Makeover a Vintage Radio Cabinet

โ€”

by

in

95ee4-img.jpg

I know you’ve probably been wondering what cabinet it was I’ve been doing all these projects on! The cabinet access hole, then the little mini curtain… clearly I am up to something.

After I got discouraged about the someday mud room, I started working on my workshop (aka office / craft room), and I kind of got on a roll. I decided to just focus on one small area and go from there, so I’m working on the back wall where Mr. Magpie put the built-in cabinets and wainscoting. The first thing I did was hang a gallery of plates, and then I started working on this little cabinet for storage.

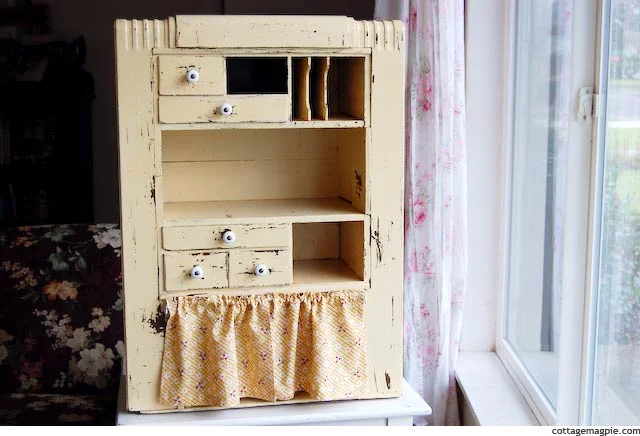
A couple of summers ago I found this cute little cabinet at a yard sale around the corner. I can’t remember what I paid for it, maybe $10? Mr. Magpie said it looked like an old radio cabinet, and I said I couldn’t possibly be with all those drawers and mail slots. Guess what? We were both right. I found a sticker inside saying that it’s a radio, but all the mail slots and drawers were added later because they are a different kind of wood and have screws and things in them. Plus… way wonky!

It kicked around the house for a couple of years, waiting to be made over. This last week, it finally hit the top of the list. Read on to see the transformation!

This is what it looked like before I started working on it.

First I put a coat of pale yellow paint on it. It’s flat Martha Stewart oops paint I had picked up somewhere for a few bucks a few years ago and have been hoarding… um, I mean storing… in the garage.

I didn’t prime or anything, and I didn’t sand either. I just slapped the paint on. I knew I was going to be distressing, so I wanted to leave as much texture as possible.

I put a second coat on as soon as the first one was dry, and as soon as it was dry, I started banging the paint up a bit. I usually use a paint scraper for this, but you can use anything handy. The paint is usually pretty soft, so it scrapes very easily. I did this one right away, but on the green cabinets in the family room, I did those the next day.

After it dried more thoroughly I put a coat of poly on it and put the handles back on.

I just happened to have poly on hand, and I like how easy it is. I also like how it pulls the stain up through the paint and ages the paint. It’s more random than glaze, but I think it looks neat and I’m terrible at glazing, so I like to let nature take it’s course! ๐Ÿ™‚

Then I did the access hole and made the little curtain, and she was done!

For more information on the hole and curtain, you can see the tutorials “How to Drill a Cabinet Access Hole” and “How to Hang Super-Cheap Small Cabinet Curtains.”

Here’s a side-by-side comparison:

All in all, I’m very happy with it! I think it’s cute and it makes me happy every time I walk in this room.

I couldn’t help but take a slew of pictures.

I thought we had that last drawer, so I didn’t paint that spot. If I can’t find the drawer in the next few months I’ll circle back and paint that little spot and use it like a cubby like I did with this one here:

Now I’m storing all my little notions and things in it. Jars of pins and buttons, stapler, scissors, extra thread, that sort of thing. I can’t believe I didn’t do this project sooner!!

How about you? Do you have any projects kicking around that you’ve been wanting to get to?

Love, Angela


Comments

40 responses to “How to Makeover a Vintage Radio Cabinet”

  1. You know what? Seeing this cabinet makes ME happy too! I’m afraid to put a paintbrush to a large piece of furniture, for fear of ruining it. (The same reason I own fabulous fabric that I haven’t put scissors to…) Making it ‘distressed’ really takes the pressure off!

    1. Tanya, it’s so scary, isn’t it? I have quite a few pieces of fabric like that! And while I was brave on this little piece because it’s small, I have a certain oak bed that I have been stalling on since I bought it six years ago!! Maybe a few more smaller pieces will give me more confidence. Thanks for stopping by! ~Angela~

  2. I love it!! That paint job is amazing. Great Job!!

    1. Thank you, Jen! ๐Ÿ™‚ ~Angela~

  3. Looks gorgeous! Love the paint color you chose and the distressing you did!Jenna @ rainonatinroof.com

    1. Thank you, Jenna! I love this paint color, too. I am going to have to figure out a close equivalent, because it was a mis-tint I picked up in the “oops” section at Home Depot! I have already started to think of what I might be able to use it for next. Hee hee! ~Angela~

  4. That’s a great cabinet! Love what you’ve done to it, too! And see? One little thing will lead to another and before you know it that mudroom will be history! For now, fill that puppy up with all your goodies!!! And enjoy the rest of your weekend!

    1. Thank you, Dona! It does seem to be working that way, doesn’t it? And I even went through a few more boxes in the mudroom yesterday, too! Wheeee!! Thanks for your encouragement! ~Angela~

  5. Angela,This is beautiful. What a great piece to start with and your paint choice and that adorable skirt really made this piece so so cute. I love it. Great job.Kris

    1. Thank you so much, Kris! I’m pleased with it. Kind of surprised it worked, but pleased! ๐Ÿ™‚ ~Angela~

  6. So cute!I love how you abandon projects for another one. I do too, but I love how you tell the story.

    1. Oh, thank you, SJ! I have always felt bad about being that way, especially with the blog — it’s so liberating to just follow my muse! Thank you so much for appreciating it. I always worry that people will get frustrated with me on the blog, but I can’t be any other way! ๐Ÿ™‚ Thanks again. ~Angela~

  7. It’s adorable! Good job, Angela!

    1. Thank you, Claudia!! ~Angela~

    2. Thank you, Claudia!! ~Angela~

  8. She (and to me she clearly is a “she”) is definitely ready for her close-up! You took a fun piece and made it cottage perfect.

    1. Thank you Janelle! She does seem quite feminine with her flirty skirt, doesn’t she? Hee hee! ~Angela~

  9. Wow what a cool piece I love it. I may get my nerve up to pant something one of these days. ๐Ÿ™‚

    1. Thank you, Robin! It took some working up to it, for sure! Start with something small, that’s my advice. I started last fall with a picture frame, and even that I was nervous about! ~Angela~

  10. Very nice, and definitely a she!So pretty in your space, thank you for sharing!

    1. Thank you, Katie! Hopefully I can make the rest of the space as good, too! ๐Ÿ™‚ ~Angela~

  11. Looks way better with your vintage look. Come link it up with us at the party: http://www.finecraftguild.com/party-50/

    1. Thank you, Rose! That’s so sweet. I’ll come check the party out right now! ~Angela~

  12. it’s cute as a button, angela!found you via FCC and we’d love to have you stop by when you have a moment!smiles.michele

    1. Thank you so much, Michele! I’ll pop over right now. ~Angela~

    1. Thank you, Jeanette! ~Angela~

  13. Super cute~ I love how it came out!! Sharing at the party tonight~ thanks for linking up at Feathered Nest Friday!

    1. Oh, gosh, thank you Courtney!! That is so sweet! I’ll definitely be there to check it out. Thanks again! ~Angela~

  14. LOVE>>>LOVE>>>LOVE this little re-do…especially the rustic finish with the little rurrled curtain. It reminds me of my Rustic, Shabby Glam Washstand…it’s my most viewed post!I am following you now on FB and by mail. looking forward to seeing what other great projects you come up with!

    1. Thanks, JP! I’m intrigued now — I have to come see your washstand. It sounds like something I might love! Following you back. ๐Ÿ™‚ ~Angela~

  15. Pinned! I want to do this right away on something. Lord knows I’ve got enough old furniture from picking up off the curb… ๐Ÿ™‚ Would love to have you share this at What to Do Weekends Party – wouldn’t this be a great weekend project? Lindahttp://www.craftsalamode.com/2013/02/what-to-do-weekends-5.html

    1. Hee hee! I am totally with you! I am a sucker for the roadside fines. Oh, let’s be hoenst, I’m a sucker for all finds!! It’s a problem. Haha. I’m heading over to link up right now, thanks for the invite! ~Angela~

  16. This is so pretty and very vintage look!

    1. Thank you so much, Monica! ~Angela~

  17. Thank you so much for sharing. What vision you had! Featuring at my party which starts at 2:00 PST. Thanks!

    1. Oh, thank you so much Karen! I’m honored! ๐Ÿ™‚ ~Angela~

  18. […] project is so unique.ย  Is it an old radio cabinet?ย  Is it a plate holder?ย  It’s both!ย  Cottage Magpie picked this up from a garage sale for $10 and gave it a whole new life, including the cute little […]

  19. I just came upon this little gem of a blog you have while looking for those old wire coils they used a long time ago to hang hutch curtains for tightness top and bottom. No luck on the wire coils but this blog is amazing. This project has given me the courage to take on my grammy’s old stereo cabinet that has been sitting in the basement for 20+ years collecting spiders and dust. Thank you so much! I have definately bookmarked your blog!

    1. Awww, thanks, Nancy! That’s so sweet! I’m touched. Let me know how your stereo cabinet turns out!! ~Angela~

Leave a Reply

Your email address will not be published. Required fields are marked *