

Yesterday I finally finished up the “scrappy trip” placemats that I made as a late Christmas gift. These were made in fall colors for the recipient, but just imagine them in ombre, or rainbow, or my favorite, vintage feedsack prints. They’re really easy — I thought you might like to know how to make some yourself.
For inspiration, I used the Quiltville Scrappy Trip Around the World tutorial, but I altered it so it would make a placemat instead of a quilt. I had so much fun making these, that I really want to go ahead and make a full quilt version, especially after seeing all these cute ones!
They’re super addictive to make, and super fun. I am having a hard time resisting the urge to abandon my other works in progress and start a full quilt using this same technique. So fun! At any rate, whatever colors you use, this is how you do it:
Scrappy Trip Placemat Tutorial
Since my tutorial is based on Bonnie’s tutorial at Quiltville, I’ve only included the parts that are specific to a placemat project. For more details on the basic construction of strips and tubes, please refer to her tutorial.
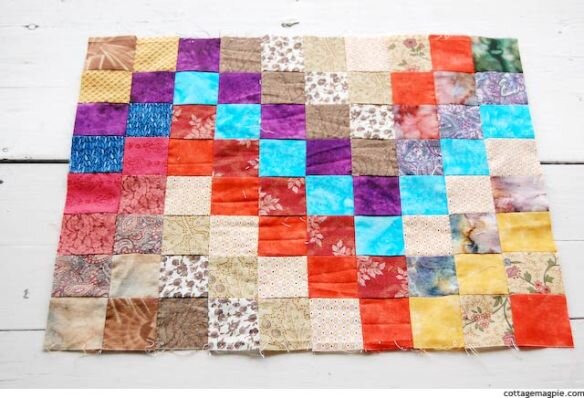
I tend to have 2″ strips on hand, so that’s what I used instead of the 2 1/2″ strips that the original pattern calls for. The placemat finishes at 8 little squares by 10 squares, or 12″ x 15″. I chose that because it was easy to remember, but you could easily do 8 squares x 11 squares for a placemat that was 12″ x 16 1/2″.
To do 6 placemats, you’ll need about 156 2″ strips, 10 1/2″ long.
You make them half at a time. For each half placemat, cut 8 strips 2 inches wide and a little more than 10 inches long. (You can cut them exactly 10″, but if you’re not perfect sewing you will end up with wonky ends. I preferred to cut them 10 1/2″ and square up the ends). Line them up in a way that looks good to you:

Then, sew them all together, then the ends together to make a long tube. then square the ends up and cut the whole tube into five 2″ sections (Again, for more detailed instructions, please see the original tutorial from Quiltville).

Now, UNdo one seam in each loop, but offset by one, so that when you lie them next to each other, they make a diagonal:


Press the seams up on one strip, down on the next, up on the next, and so on. Sew them together and press:

You now have half of a placemat ready to go!
Next, you do the same thing again, and then arrange the next five strips so the diagonals go the way you want them to. You could make a chevron, or zig-zag, or whaver you want. I chose to put my first unit in the middle and put my other strips on each side, to make an uppy-downy kind of pattern.
Also, as you can see here with this one, I wanted to use up some strips that were too short to make a full section, so for the second half I did one section of 2 (on the left), which required only 4 1/2″ strips, and one section of 3 (on the right), which required only 6 1/2″ strips. Make sense?
However you arrange it, after that you treat it like any quilt. Quilt it:

Square it up:

And bind it, completing one placemat!

Repeat that five more times and, voila! You have a set of 6 pretty placemats!


Whaddya think? Do you think you’ll make some?

Leave a Reply